|
Monday 4 June 2012
Mixed Bunch Stamp-a-stack
Monday 2 November 2009
Double Digit Boy
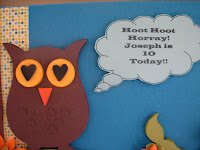
A couple of weeks ago my darling son turned 10! Yes, he is now a 'double digit boy'! :-)
Here is the card I made for him.

It is a case from the IB&C on pg 11 but of course I changed a few things.


He really loved it and of course my daughter has asked for a card like that for her birthday next year :-)
Supplies:
Paper: Pacific Point, Old Olive, Tangerine Tango, Summer Sun, Basic Black, Baja Breeze, Good Morning Sunshine DSP
Accessories: On Board So Tweet, Chocolate Chip Double Stitched Grosgrain Ribbon, Circle Ice Rhinestone Brads, Flower Fusion Felt Flowers
Non- Stampin' Up!: Hand held heart punch, Speech Bubble - computer generated
Until next time....
Here is the card I made for him.
It is a case from the IB&C on pg 11 but of course I changed a few things.
He really loved it and of course my daughter has asked for a card like that for her birthday next year :-)
Supplies:
Paper: Pacific Point, Old Olive, Tangerine Tango, Summer Sun, Basic Black, Baja Breeze, Good Morning Sunshine DSP
Accessories: On Board So Tweet, Chocolate Chip Double Stitched Grosgrain Ribbon, Circle Ice Rhinestone Brads, Flower Fusion Felt Flowers
Non- Stampin' Up!: Hand held heart punch, Speech Bubble - computer generated
Until next time....
Friday 4 September 2009
Tweet Little Bird
Supplies:
Stamps: Polka Dot, Best Yet, Window Dressing
Card: Pink Pirouette, Old Olive, Rose Red, Kiwi Kiss, Very Vanilla, Raspberry Tart DSP
Punches: Scallop Circle, Scallop Edge, 1 3/8" Circle
Ink: Pretty in Pink, Rose red
Accessories: Kiwi Kiss Satin Ribbon, Dimensionals
Until next tiem...
Janine
Wednesday 2 September 2009
Birthday Cupcake
For the label I have used the Curly Label Punch Bundle and again just inked it up using a Chocolate Chip Marker as I didn't want to use the 'thank you' message. The message is from Best Yet, Level 1 Hostess Set.
It looks good enough to eat I think :-)
Until next time...
Janine
Tuesday 1 September 2009
Teddy Bear Fairies
Hello again!
I know, it has been an awfully long time between posts. I do apologise, but I do have a wee bit of an excuse. I am 16 weeks pregnant with my third child and have been feeling pretty yuk. Only now am I feeling a little like my old self :-)
I haven't been terribly busy creating, but I have managed to make a few cards when birthdays have come along. I will post these over the next few days.
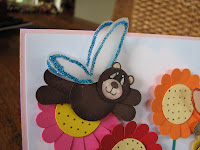
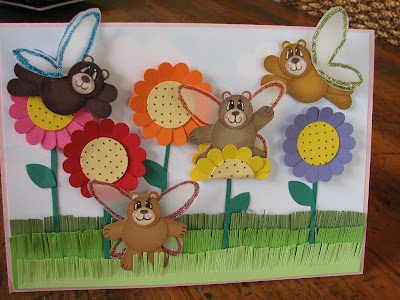
Last week was my daughters 7th birthday. For her party we went to the Teddy Factory where all the children got to make their own teddy bear to take home. It was very sweet. I do not own a teddy bear stamp so I decided to make my own wee teddies. I found a tutorial on Andrea Wilford's blog (she is a very talented Canadian demonstrator) on how to make teddy bears with punches. They were very easy and fun to make.


Andrea uses a butterfly die for the wings which we don't have here in New Zealand, so I had to put my thinking cap on. What I did was trace around the butterfly wings from the Garden Whimsy set onto vellum, and cut them out. Viola! Fairy wings, just the right size :-)
For the background sky with clouds, I cut a template of a cloud from card and sponged the sky with Stampin Pastels. The flowers are also punched from the Scallop Circle and 1" Circle punches.


My daughter absolutely loved the card and I was pretty chuffed with the outcome too.
Supplies:
Card: Pink Pirouette, Whisper White, Pink Passion, Real Red, Only Orange, Yoyo Yello, Lovely Lilac, So Saffron, Gable Green, Glorious Green, Green Galore, Wild Wasabi (retired), Vellum, Chocolate Chip, Creamy Caramel, Kraft, More Mustard
Stamps: Itty Bitty Background (retired)
Punches: Scallop Circle, 1" Circle, 1/2 " Circle, Word Window, regular hole punch, 5 Petal Punch
Accessories: Sponge Daubers, Stampin Pastels, White Gel Pen, Stampin' Write Markers, Fine Supernova Stampin Glitter, 2-Way Glue, Dimensionals.
Until next time...
Janine
I know, it has been an awfully long time between posts. I do apologise, but I do have a wee bit of an excuse. I am 16 weeks pregnant with my third child and have been feeling pretty yuk. Only now am I feeling a little like my old self :-)
I haven't been terribly busy creating, but I have managed to make a few cards when birthdays have come along. I will post these over the next few days.
Last week was my daughters 7th birthday. For her party we went to the Teddy Factory where all the children got to make their own teddy bear to take home. It was very sweet. I do not own a teddy bear stamp so I decided to make my own wee teddies. I found a tutorial on Andrea Wilford's blog (she is a very talented Canadian demonstrator) on how to make teddy bears with punches. They were very easy and fun to make.
Andrea uses a butterfly die for the wings which we don't have here in New Zealand, so I had to put my thinking cap on. What I did was trace around the butterfly wings from the Garden Whimsy set onto vellum, and cut them out. Viola! Fairy wings, just the right size :-)
For the background sky with clouds, I cut a template of a cloud from card and sponged the sky with Stampin Pastels. The flowers are also punched from the Scallop Circle and 1" Circle punches.
My daughter absolutely loved the card and I was pretty chuffed with the outcome too.
Supplies:
Card: Pink Pirouette, Whisper White, Pink Passion, Real Red, Only Orange, Yoyo Yello, Lovely Lilac, So Saffron, Gable Green, Glorious Green, Green Galore, Wild Wasabi (retired), Vellum, Chocolate Chip, Creamy Caramel, Kraft, More Mustard
Stamps: Itty Bitty Background (retired)
Punches: Scallop Circle, 1" Circle, 1/2 " Circle, Word Window, regular hole punch, 5 Petal Punch
Accessories: Sponge Daubers, Stampin Pastels, White Gel Pen, Stampin' Write Markers, Fine Supernova Stampin Glitter, 2-Way Glue, Dimensionals.
Until next time...
Janine
Labels:
Garden Whimsy,
Itty Bitty Background,
Punches
Monday 15 June 2009
Make a Wish (Part 2)
As I mentioned in the previous post, I was having trouble adding photos of my card, so here are the two photos I couldn't upload. Oh the joy of computers eh??!! :-)


The one on the left shows the glitter detail on the front of the card, and the other is a blurry shot of the inside where you write your message. Please excuse the incorrect orientation of the photo.
I really enjoyed making this card and could see the endless possibilities using different DSPs and stamp sets.
SUPPLIES:
Stamps: Good Friend, Big Bold Birthday
Card: Kiwi Kiss, Whisper White, Chocolate Chip, Good Morning Sunshine DSP
Ink: Pacific Point, Kiwi Kiss
Accessories: Dazzling Diamond, Word Window Punch, 2 Way Glue
Until Next time...
Janine
Make a Wish (Part 1)
I found this card on the very talented Heather Summer's blog (a Canadian Demo). All I changed was the greeting on the front.
It uses some In Color card and one of my favourite DSPs, Good Morning Sunshine. Here is how it stands up.
 As you can see it has a wee card- within- a- card design where you write your message.
 I stamped some more of the dandelion 'fairies' on the inside and added some Dazzling Diamonds onto the front. For some reason Blogger won't allow me to upload these photos right now so I'll post them in a separate post with the supplies list.
It uses some In Color card and one of my favourite DSPs, Good Morning Sunshine. Here is how it stands up.
Subscribe to:
Posts (Atom)
